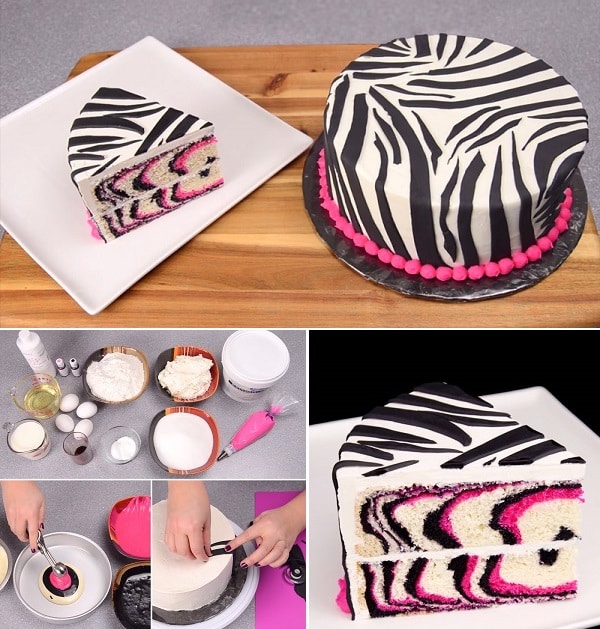
DIY Make Pink Zebra Cake

This zebra cake can definitely surprise your guests. They will wonder how you make it, since it not only looks great, but also tastes delicious.
It is easier to make than you think. Check out the directions and the video to get the procedure.
You will need
- four eggs;
- two cups of granulated sugar;
- a cup of milk;
- two and a half cups of all purpose flour;
- vanilla butter-cream;
- pink butter-cream;
- one teaspoon of vanilla extract;
- three quarters of a cup of vegetable oil;
- half a teaspoon of salt;
- two and a quarter teaspoons of baking powder;
- pink, white, and black gel paste;
- black fondant;
- a Wilton tip 1A.
CHECK THE VIDEO BELOW

Directions
Add the following ingredients and put them in a mixing bowl: the flour, the sugar and the baking powder and salt. Let it mix for 30 seconds than add the oil and the eggs one at a time.
After everything has started to incorporate add vanilla and milk while the bowl is doing it’s job. You want to let it mix until everything is combined.
Divide the mixture in three as follows: half of the mix in one bowl and the rest half divided in two different bowls.
Add the white coloring to the biggest bowl and pink and black coloring to the small bowls.
Take your round pan and with a round scoop like you can see in the pictures start creating the cake by adding layers and layers of colored batter to each other starting with the white.
The batter will be enough for two pans, so you will repeat this process for two pans and put them into the oven at 350 degrees F for about 35 to 40 minutes.
After the cake has been baked, take half of the white butter cream and fill it into the middle and the rest of it you will use for covering the cake.
Take some black fondant, spread it on a paper in a thin layer and start cutting zebra stripes out of it.
Add the zebra stripes on the cake and then the pink fondant around the bottom of it through the Wilton tip 1A and you are finished.